
ArkUI
遥遥领先!!!
官方文档
官网文档传送门:开发准备-快速入门-入门 | 华为开发者联盟 (huawei.com)
ArkUI实战传送门:官方文档 | 《ArkUI实战》
1.ArkUI常用组件
详情请移步官网
2.自定义组件
- 在当前文件下与@Entry同级下定义
// 组件
@Component
struct Header {
  // 定义私有(private)的标题
  private title: ResourceStr = "标题"

  build() {
    Row() {
      Image($r('app.media.ic_public_back'))
        .width(30)
      Text(this.title)
        .fontWeight(FontWeight.Bold)
        .fontSize(30)
        .margin({ left: 10 })
      Blank()
      Image($r('app.media.ic_public_refresh'))
        .width(30)
    }
    .width('100%')
    .height(30)
  }
}

// 页面核心部分
@Entry
@Component
  build() {
    Column({ space: 8 }) {
      //自己的写组件名字采用函数式调用 对象传参
      Header({
        title: '商品列表'
      })
        .margin({ bottom: 20 })//每个自定义组件都可以加样式
    }
  }
}
单独文件(components)中定义使用(推荐使用)
定义
要加上export 导出
@Component export struct Header { // 定义私有(private)的标题 private title: ResourceStr = "标题" build() { Row() { Image($r('app.media.ic_public_back')) .width(30) Text(this.title) .fontWeight(FontWeight.Bold) .fontSize(30) .margin({ left: 10 }) Blank() Image($r('app.media.ic_public_refresh')) .width(30) } .width('100%') .height(30) } }使用
// 1.组件导入
import {Header} from '../components/CommenHeader'

@Entry
@Component
struct ListLayout {
//	2.使用
  build() {
    Column({ space: 8 }) {
      Header({
        title: '商品列表'
      })
        .margin({ bottom: 20 })
    }
  }
}
3.自定义构建函数
3.1.全局构建函数
在当前文件下与@Entry同级下,当前文件可用
语法:@Builder function GoodsCard(item:GoodsItem){
Row({ space: 10 })
}
// 定义数据的基本成员以及类型
class GoodsItem {
  name: string
  image: ResourceStr
  price: number

  constructor(name: string, image: ResourceStr, price: number) {
    this.name = name
    this.image = image
    this.price = price
  }
}
// 组件导入
import {Header} from '../components/CommenHeader'

// 定义全局构建函数
@Builder function GoodsCard(item:GoodsItem) {
  Row({ space: 10 }) {
    Image(item.image)
      .width(100)
    Column() {
      Text(item.name)
        .fontWeight(FontWeight.Bold)
        .fontSize(26)
      Text(item.price.toFixed(2))
        .fontColor('#f44')
        .fontSize(24)
    }
    .alignItems(HorizontalAlign.Start)
    .height('100%')
    .justifyContent(FlexAlign.SpaceEvenly)
  }
  .height(120)
  .borderRadius(20)
  .backgroundColor('#fff')
  .padding(10)
}

// 页面核心部分
@Entry
@Component
struct ListLayout {
  private goodsList: Array<GoodsItem> = [
    new GoodsItem('HUAWEI Mate60 Por', $r('app.media.app_icon'), 100.00),
    new GoodsItem('HUAWEI Mate60 Por', $r('app.media.app_icon'), 100.00),
  ]

  build() {
    Column({ space: 8 }) {
      Header({
        title: '商品列表'
      })
        .margin({ bottom: 20 })
      List({ space: 10 }) {
        ForEach(
          this.goodsList,
          (item: GoodsItem) => {
            ListItem() {
              // 直接函数式调用,并传入参数
              GoodsCard(item)
            }
            .width('100%')
          }
        )
      }
      .width('100%')
      .layoutWeight(1) //相当余剩余全部分配 类似于flex:1
      // .listDirection(Axis.Horizontal)  设置list的横向和纵向
    }
    .padding(20)
  }
}
3.2.内部构建函数
定义在某个组件里面去掉function,调用时加上this,当前组件内可用
语法:@Builder GoodsCard(item:GoodsItem){
Row({ space: 10 })
}
@Entry
@Component
struct ListLayout {
  private goodsList: Array<GoodsItem> = [
    new GoodsItem('HUAWEI Mate60 Por', $r('app.media.app_icon'), 100.00),
    new GoodsItem('HUAWEI Mate60 Por', $r('app.media.app_icon'), 100.00),
  ]

  build() {
    Column({ space: 8 }) {
      Header({
        title: '商品列表'
      })
        .margin({ bottom: 20 })
      List({ space: 10 }) {
        ForEach(
          this.goodsList,
          (item: GoodsItem) => {
            ListItem() {
              this.GoodsCard(item)//函数式调用传入参数item
            }
            .width('100%')
          }
        )
      }
      .width('100%')
      .layoutWeight(1) //相当余剩余全部分配 类似于flex:1
      // .listDirection(Axis.Horizontal)  设置list的横向和纵向
    }
    .padding(20)
  }

  //   内部构建函数
  @Builder GoodsCard(item: GoodsItem) {
    Row({ space: 10 }) {
      Image(item.image)
        .width(100)
      Column() {
        Text(item.name)
          .fontWeight(FontWeight.Bold)
          .fontSize(26)
        Text(item.price.toFixed(2))
          .fontColor('#f44')
          .fontSize(24)
      }
      .alignItems(HorizontalAlign.Start)
      .height('100%')
      .justifyContent(FlexAlign.SpaceEvenly)
    }
    .height(120)
    .borderRadius(20)
    .backgroundColor('#fff')
    .padding(10)
  }
}
4.自定义样式装饰器
- 基本用法
样式装饰器区分全局和内部规则和构建函数一样
定于到@Entry同级
注意: 用于定义公共属性
//定义,全局去掉function
@Styles function fillScroll(){

	.widht('100%')

	.height('100%')

	.padding(20)

	.backgroundColor('#fff')

}
//使用,全局加this
fillScroll()
- 继承模式
公共属性按照上方方式写,非公共属性需要把@Styles换成@Extend(Text)
@Extend(Text)表示继承与Text组件
注意:@Extend()语法不能写在组件内,只能定义到全局
@Extend(Text) function priceText{
    fontColor('#f60')
    fontSize(28)
}
5.状态管理
5.1.@State装饰器
你把他当成响应式
注意:@ State声明时不能为空值,必须要有初始值
支持类型:object|clss|string|number|boolean|enum以及支持这些类型的数组
嵌套类型无法更新(有解决方法,放在后面):
1.对象中包含对象的属性更新无法更新
2.数组中的对象属性无法出发视图更新
3.数组元素是对象,新增删除可以触发更新,但对象里面的某个元素更新不会触发
用法
class Person {
  name: string
  age: number

  constructor(name: string, age: number) {
    this.name = name
    this.age = age
  }
}

@Entry
@Component
struct statePage {
  //使用@State定义
  @State p1: Person = new Person('张三', 20)

  build() {
    Row() {

  }
}
5.2.@Prop与@Link
当父子组件之间需要数据同步时,可以使用@Prop和@Link装饰器
使用@Prop和@Link声明不能初始化值
| @Prop | @Link | |
|---|---|---|
| 同步类型 | 单向同步(子组件与后代组件修改不会传递给父组件) 具体做法:拷贝,互不影响 | 双向同步(互相修改,数据互相传递) 具体做法:传递变量引用,使用同一个变量 |
| 允许装饰的变量类型 | 只支持string,number,boolean,enum 父组件对象类型,只组件是对象属性 不可以是数组,any | 父子类型一致:string,number,boolean,object,class,以及他们的数组 数组中增,删,替换会引起刷新 嵌套类型以及数组中的对象属性无法触发视图更新 |
| 初始化方式 | 不允许子组件初始化 | 父组件传递,禁止子组件初始化 |
@Prop用法
父组件
@Entry
@Component
struct statePage {
  // 任务总数
  @State totleTask: number = 0
  // 完成任务数
  @State finishTask: number = 0
  build() {
    Column({ space: 10 }) {
      // 任务统计
      TaskStatistics({
        finishTask:this.finishTask,
        totleTask:this.totleTask,
      })
  }
}
子组件
@Component
struct TaskStatistics {
  //注意不能初始化值
  @Prop finishTask:number
  @Prop totleTask:number
  build() {
    Row() {
      Text('任务进度:')
        .fontSize(30)
        .fontWeight(FontWeight.Bold)
    }
  }
}
@Link用法
父组件 传参时使用$,而不是this.
@Entry
@Component
struct statePage {
  // 任务总数
  @State totleTask: number = 0
  // 完成任务数
  @State finishTask: number = 0

  build() {
    Column({ space: 10 }) {
      // 任务统计
      TaskStatistics({
        finishTask: this.finishTask,
        totleTask: this.totleTask,
      })
      TaskList({
        totleTask: $totleTask,
        finishTask: $finishTask,
      })
    }
    .width('100%')
    .height('100%')
    .backgroundColor('#fff')
  }

}
子组件
@Component
struct TaskList {
  // 任务数组
  @State tasks: Task[] = []
  @Link totleTask: number
  @Link finishTask: number
  // checkbox更新
  handChangeCheckBox() {
    // 更新总数
    this.totleTask = this.tasks.length
    // 更新已完成的状态
    this.finishTask = this.tasks.filter(task => task.finished).length
  }

  build() {
    Column(){
      Button('新增任务')
        .width(200)
        .onClick(() => {
          // 新增任务
          this.tasks.push(new Task())
          // 更新总数
          this.handChangeCheckBox()
        })
    }
  }
}
5.3.@Provide与@Consume
使用父组件使用@Provide,子组件与后代组件使用@Consume
父组件无需传参,子组件直接使用,代码简化了很多
一般用于跨组件传参,与@Link机制类似,非跨组件建议更具需求使用@Prop与@Link
当你传了一个对象,但是后代组件未使用到一些属性,必然会照成浪费资源
入口只需要使用@Provide声明
class stakInfo{
  totleTask: number = 0
  finishTask: number = 0
}

@Entry
@Component
struct statePage {
  @Provide stak:stakInfo =new stakInfo()

  build() {
    Column({ space: 10 }) {
      // 任务统计
      TaskStatistics()
    }
    .width('100%')
    .height('100%')
    .backgroundColor('#fff')
  }

}
组件中使用@Consume接收
//任务统计组件
@Component
struct TaskStatistics {
  @Consume stak:stakInfo

  build() {
    Row() {
      Text('任务进度:')
        .fontSize(30)
        .fontWeight(FontWeight.Bold)
      Stack() {
        Progress({
          value: this.stak.finishTask,
          total: this.stak.totleTask,
          type: ProgressType.Ring
        })
          .width(100)
        Row() {
          Text(this.stak.finishTask.toString())
            .fontSize(24)
            .fontColor('#36d')
          Text(' / ' + this.stak.totleTask.toString())
            .fontSize(24)
        }
      }
    }
    .cardStyle()
    .margin({
      top: 20,
      bottom: 10
    })
    .justifyContent(FlexAlign.SpaceEvenly)
  }
}
// 卡片样式
@Styles function cardStyle() {
  .width('100%')
  .padding(20)
  .backgroundColor('#fff')
}
6.@Observed与@ObjectLink
@Observed和**@ObjectLink装饰器用于在涉及嵌套对象或数组元素为对象的场景中进行双向数据同步**
使用时需要在需要观察的类上加上**@Observed**
由于参数无法加**@ObjectLink**,所以我们使用组件,然后在组件中使用**@ObjectLink** item:Task进行声明
@Observed
class Task {
  static id: number = 1
  name: string = `任务${Task.id++}`
  finished: boolean = false
}
接收时需要使用@ObjectLink声明一个变量,通常使用组件中的变量
...
//列表中调用组件使用
List({ space: 10 }) {
        ForEach(
          this.tasks,
          (item: Task, index) => {
            ListItem() {
              TaskItem({item: item,onTaskChange:this.handChangeCheckBox.bind(this)})//传递函数,方便子组件调用这里需要使用.bind(this)的语法绑定父组件的this,否则会被识别为子组件中调用函数,将会用子组件的this
            }
            .swipeAction({
              end: this.DelBtn(index)
            })
          }
        )
      }
      .width('100%')
      .alignListItem(ListItemAlign.Center)
      .layoutWeight(1)
...
// TaskItem组件
@Component
struct TaskItem {
  @ObjectLink item:Task
  //子组件声明需要接收的函数,()=>void表示返回值为空的函数
  onTaskChange:()=>void
  build() {
    Row() {
      if (this.item.finished) {
        Text(this.item.name)
          .fontSize(20)
          .fontColor('#36d')
          .decoration({type:TextDecorationType.LineThrough})
      } else {
        Text(this.item.name)
          .fontSize(20)
      }

      Checkbox()
        .select(this.item.finished)
        .onChange((val) => {
          // 更新当前任务状态
          this.item.finished = val
          // 更新已完成的状态,调用父组件传过来的函数
          this.onTaskChange()
        })
    }
    .cardStyle()
    .justifyContent(FlexAlign.SpaceBetween)
  }
}
7.页面路由
页面栈:
- 最大容量为32个页面:使用router.clear()方法可以清空页面栈释放内存
router的两种页面跳转模式:
router.pushUrl()
目标页面不会替换当前页面,而是压入页面栈,因此可以使用**router.back()**返回当前页
router.replaceUrl()
目标页面会替换当前页面,当前页面会被销毁并释放资源,无法返回当前页面
页面创建实例的两种模式:
Standard
标准实例模式,每次跳转都会新建一个目标页,补齐压入栈页.默认就是这种模式
Single
单实例模式,如果目标页已经在栈中,则离栈顶最近的同Url页面那会被移动到栈顶并重新加载
使用router跳转页面
想要跳转页面,前提是必须要在src/main/resources/base/profile/main_pages.json中配置src列表,如果创建页面时选择的是page,则自动添加创建的src
导入HarmonyOS提供的Router模块
import router from '@ohos.router';然后利用router实现跳转,返回等操作
//router.replaceUrl同理
router.pushUrl(
	{
        url:'page/goods/index',//路径必填
        parmas:{id:1},//传参,可选
	},
	router.RouterMode.Single,//指定页面创建实例,Standard | Single
    err=>{
        if(err){
           console.log('路由失败',err)
           }
    }
)
参数获取
params: any =router.getParams()返回页
//返回上一页
router.back()
//返回指定页并携带参数
router.back({
	url:'pages/home/index',
    params:{id:1}
})
err异常响应列表
| 错误码 | 原因 |
|---|---|
| 100001 | 内部错误,可能是渲染失败 |
| 100002 | 路由地址错误 |
| 100003 | 路由栈中超过32个 |
返回前的弹窗提示
点击取消,不再继续执行,点击确认,继续执行
import router from '@ohos.router'
//返回前的弹窗提示
router.showAlertBeforeBackPage({
    message:'支付还未完成,确认要返回吗?'
})
//返回上一页
router.back()
8.动画
属性动画
建议animation属性放在最后,否则在它后面的属性无法作用动画
animation属性参数
一个animation延迟动画小案例
@Entry
@Component
struct AnimationPage {
  // 是否开始
  @State isBegin: boolean = false
  // 鱼的坐标
  @State fishX: number = 200
  @State fishY: number = 180
  // 小鱼角度
  @State angle: number = 0

  build() {
    Row() {
      Stack() {
        if (!this.isBegin) {
          Button('开始游戏')
            .onClick(() => this.isBegin = true)
        } else {
          // 小鱼图片
          Image('https://img0.baidu.com/it/u=2971050204,4150337549&fm=253&fmt=auto&app=138&f=JPG?w=300&h=300')
            .position({ x: this.fishX - 20, y: this.fishY - 20 })
            .rotate({ angle: this.angle, centerX: '50%', centerY: '50%' })
            .width(40)
            .height(40)
            .animation({duration:500})
            .onClick(()=>{
              this.fishX=200
              this.fishY=180
            })
          //   操作鱼按钮

          Row(){
            Button('←').backgroundColor('#20101010')
              .onClick(()=>this.fishX-=20)
            Column({space:40}){
              Button('↑').backgroundColor('#20101010')
                .onClick(()=>this.fishY-=20)
              Button('↓').backgroundColor('#20101010')
                .onClick(()=>this.fishY+=20)
            }
            Button('→').backgroundColor('#20101010')
              .onClick(()=>this.fishX+=20)
          }
            .position({x:0,y:200})
        }
      }
      .width('100%')
      .height('100%')
    }
    .width('100%')
    .height('100%')
    .backgroundImage('https://img1.baidu.com/it/u=2107379213,3489148536&fm=253&fmt=auto&app=138&f=JPEG?w=800&h=291')
    .backgroundImageSize({
      width: '100%',
      height: '100%'
    })
  }
}
显式动画(推荐使用)
通过全局函数,直接调用**animateTo()**显式调用函数触发动画
使用这种方式达到相同效果,且更加灵活,还能给每一个不同的动画加不一样的效果
animateTo()语法
animateTo(
	{duration:1000},//动画参数
    ()=>{
        //修改组件属性关联的状态变量
    }
)
使用animateTo()修改属性动画
//按照上方语法结合上面的案例 , 修改改变动画的属性 ,同样达到动画过渡
Button('←').backgroundColor('#20101010')
    .onClick(()=>{
    animateTo(
        {duration:500},
        ()=>{
            this.fishX-=20
        }
    )
})
9.组件转场动画
组件内转场动画-页面内的动画-使用动画-基于ArkTS的声明式开发范式-UI开发-开发 | 华为开发者联盟 (huawei.com)
注意:组件转场是这个组件插入或者入场时才执行,只有使用animateTo()中的第二个回调函数中改变控制其入场或出场的条件才会有转场动画
案例
// 开始专场动画
  @State isTransition: boolean = false

//点击入场
Button('←').backgroundColor('#20101010')
  .onClick(() => {
    animateTo(
      { duration: 500 },
      () => this.isTransition=true
    )
  })
//要转场的组件
if(this.isTransition){
    Text('☺')
        .transition({
        opacity:0,
        translate:{x:10,y:10},
        scale:{x:1.5},
        rotate:{angle:360}
    })
}

//点击离场
Button('←').backgroundColor('#20101010')
  .onClick(() => {
    animateTo(
      { duration: 500 },
      () => this.isTransition=false
    )
  })
10.页面转场动画
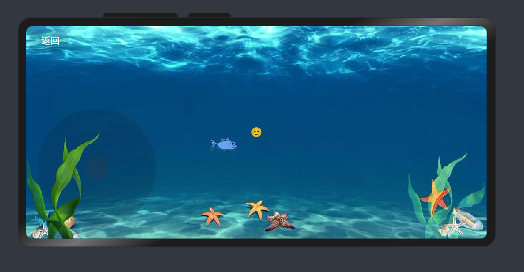
11.实现一个摇杆控制物体移动
import router from '@ohos.router'
import curves from '@ohos.curves'

@Entry
@Component
struct AnimationPage {
  // 小鱼
  @State fishSrc: Resource = $r('app.media.fish')
  // 是否开始
  @State isBegin: boolean = false

  // 鱼的坐标
  @State fishX: number = 240
  @State fishY: number = 120

  // 小鱼角度
  @State angle: number = 0

  // 开始专场动画
  @State isTransition: boolean = false

  // 摇杆中心区域坐标
  private centerX: number = 120
  private centerY: number = 120

  // 大小圆半径
  private maxRadius: number = 100
  private radius: number = 20

  // 摇杆小圆球初始位置  摇杆中心坐标
  @State positionX: number = this.centerX
  @State positionY: number = this.centerY

  // 角度正弦,余弦
  sin: number = 0
  cos: number = 0

  // 小鱼移动速度
  speed: number = 0
  // 任务id
  staskId: number = -1

  build() {
    Row() {
      Stack() {
        Button(' 返回')
          .position({ x: 5, y: 5 })
          .backgroundColor('#20101010')
          .onClick(() => router.back())

        if (!this.isBegin) {
          Button('开始游戏')
            .onClick(() => {
              this.isBegin = true
              animateTo(
                { duration: 500 },
                () => this.isTransition = true
              )
            })
        } else {
          if (this.isTransition) {
            Text('☺')
              .transition({
                opacity: 0,
                translate: { x: 10, y: 10 },
                scale: { x: 1.5 },
                rotate: { angle: 360 }
              })
            // 小鱼图片
            Image(this.fishSrc)
              .position({ x: this.fishX - 20, y: this.fishY - 20 })
              .rotate({ angle: this.angle, centerX: '50%', centerY: '50%' })
              .width(80)
              .height(80)
              .animation({ duration: 500 })
              .transition({ opacity: 0, translate: { x: -250 } })
              .onClick(() => {
                this.fishX = 200
                this.fishY = 180
                this.isBegin = false
                animateTo(
                  { duration: 500 },
                  () => this.isTransition = false
                )
              })
          }
          //   操作摇杆
          Row() {
            Circle({ width: this.maxRadius * 2, height: this.maxRadius * 2 })
              .fill('#20101010')
              .position({ x: this.centerX - this.maxRadius, y: this.centerY - this.maxRadius })
            Circle({ width: this.radius * 2, height: this.radius * 2 })
              .fill('#403a3a3a')
              .position({ x: this.positionX - this.radius, y: this.positionY - this.radius })
          }
          .width(240)
          .height(240)
          .justifyContent(FlexAlign.Center)
          .position({ x: 0, y: 120 })
          .onTouch(this.handTouch.bind(this))
        }
      }
      .width('100%')
      .height('100%')
    }
    .width('100%')
    .height('100%')
    .backgroundImage('https://img1.baidu.com/it/u=2107379213,3489148536&fm=253&fmt=auto&app=138&f=JPEG?w=800&h=291')
    .backgroundImageSize({
      width: '100%',
      height: '100%'
    })
  }

  //   手指移动
  handTouch(e: TouchEvent) {
    switch (e.type) {
      case TouchType.Up:
      //速度还原
        this.speed = 0
        clearInterval(this.staskId)
        animateTo(
          { duration: 500 },
          () => {
            this.positionX = this.centerX
            this.positionY = this.centerY

            this.angle = 0
          }
        )
        break;
      case TouchType.Down:
      //开始定时任务
        this.staskId = setInterval(() => {
          this.fishX += this.speed * this.cos
          this.fishY += this.speed * this.sin
        }, 40)
        break;
      case TouchType.Move:
      // 1.获取手指位置坐标
        let x = e.touches[0].x
        let y = e.touches[0].y
      // 2.计算手指与中心点坐标差值
        let vx = x - this.centerX
        let vy = y - this.centerY
      // 3.计算手指与中心点连线和x轴正半轴夹角
        let angle = Math.atan2(vy, vx)
      // 4.计算手指与中心店距离
        let distance = this.getDistance(vx, vy)
      // 5.计算摇杆小球坐标
        this.sin = Math.sin(angle)
        this.cos = Math.cos(angle)
        animateTo(
          { curve: curves.responsiveSpringMotion() },//延时动画
          () => {
            this.positionX = this.centerX + distance * this.cos
            this.positionY = this.centerY + distance * this.sin
            //   移动小鱼和角度
            if (Math.abs(angle * 2) < Math.PI) {
              this.fishSrc = $r('app.media.fish')
            } else {
              this.fishSrc = $r('app.media.fish_rev')
              angle = angle < 0 ? angle + Math.PI : angle - Math.PI
            }
            this.angle = angle * 80 / Math.PI
            this.speed = 10
          }
        )
        break;
      default:
        break;
    }
  }
  // 距离计算
  getDistance(x: number, y: number) {
    let d = Math.sqrt(x * x + y * y)
    return Math.min(d, this.maxRadius)
  }
}